Ready to transform your kitchen scraps into black gold for your garden? Composting turns everyday waste into rich soil that makes plants thrive. The best part? You only need three things to start: brown materials like dried leaves, green materials like vegetable scraps, and water to keep everything moist.
Forget the myths about composting being complicated or messy. The truth is, nature does most of the work. Whether you have a sprawling backyard or just a small balcony, you can start composting today and see results in just a few months.

Understanding Composting Basics
What Is Composting and How Does It Work?
Think of composting as cooking for your garden. Just like a recipe needs the right ingredients, successful composting relies on four key elements working together:
The Magic Formula:
- Browns (Carbon): Dry leaves, straw, newspaper, cardboard
- Greens (Nitrogen): Fresh grass clippings, food scraps, coffee grounds
- Moisture: Keep it as damp as a wrung-out sponge
- Oxygen: Regular turning keeps things moving
The sweet spot? About 30 parts carbon to 1 part nitrogen by weight. In practical terms, use more browns than greens by volume—roughly 3 to 4 parts browns to 1 part greens.
When balanced correctly, your pile heats up to 130-160°F as billions of tiny organisms get to work. Too much water creates a soggy, smelly mess. Too little slows everything down. Turn or flip the pile every few weeks to add oxygen and speed things along.
The Invisible Army: Microorganisms at Work
Your compost pile is a bustling city of microscopic workers:
Bacteria are the heavy lifters, breaking down simple compounds and generating most of the heat. Different bacterial species tag-team the work, with some preferring cooler temperatures and others thriving in the heat.
Fungi appear as white, thread-like structures that tackle the tough stuff—wood chips, stems, and paper that bacteria can’t easily handle. They’re the specialized crew breaking down carbon-rich materials.
Without oxygen, the wrong type of bacteria takes over, creating compounds that smell like rotten eggs. Regular turning prevents this by keeping oxygen flowing throughout the pile. These organisms also need nitrogen to multiply, which is why balancing carbon and nitrogen matters so much.
Why Compost? The Benefits Add Up Fast
- Better Soil: Improves drainage in clay soils and helps sandy soils hold water
- Healthier Plants: Adds nutrients and beneficial microorganisms that boost disease resistance
- Less Waste: Food scraps and yard debris make up 30% of household trash—divert it from landfills
- Save Money: Produce hundreds of pounds of free, premium soil amendment each year
Composting Materials: Your Complete Cheat Sheet
Quick Reference: What Goes In, What Stays Out
| ✅ COMPOST IT | ❌ KEEP IT OUT | ⚠️ USE WITH CAUTION |
|---|---|---|
| Vegetable scraps | Meat, fish, bones | Grass clippings (mix with browns) |
| Fruit peels | Dairy products | Citrus peels (small amounts) |
| Coffee grounds & filters | Pet waste (dogs/cats) | Weeds with seeds |
| Crushed eggshells | Fats, oils, grease | Diseased plants |
| Dried leaves | Treated wood | Large woody branches |
| Shredded newspaper | Glossy paper | Whole eggshells (slow to break down) |
| Plain cardboard | Plastic stickers | Sawdust from treated wood |
| Grass clippings | Coal ash | Charcoal briquette ash |
| Straw & hay | Synthetic materials | Nut shells (very slow) |
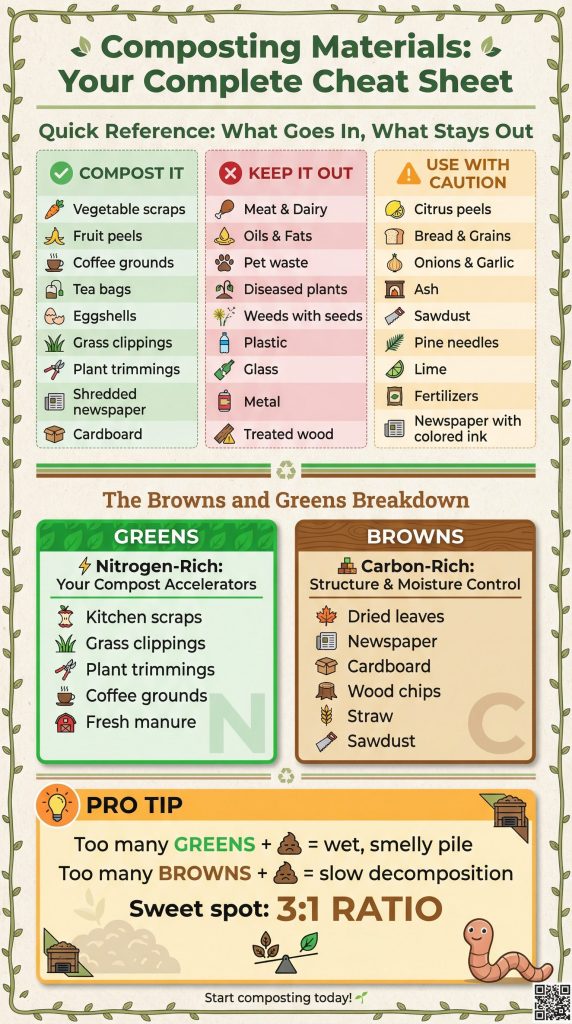
The Browns and Greens Breakdown
Greens (Nitrogen-Rich): These are your compost accelerators
- Fresh food scraps from the kitchen
- Fresh grass clippings
- Plant trimmings
- Coffee grounds
- Fresh manure (herbivores only)
Browns (Carbon-Rich): These give structure and absorb moisture
- Dried leaves (fall’s gift to composters!)
- Shredded newspaper
- Cardboard (remove tape and stickers)
- Wood chips
- Straw
- Sawdust
Pro Tip: Too many greens = wet, smelly pile. Too many browns = slow decomposition. Aim for that 3:1 ratio!
Setting Up Your Composting System
Choose Your Weapon: Bin, Tumbler, or Pile?
| Option | Best For | Pros | Cons | Cost |
|---|---|---|---|---|
| Compost Bin | Small to medium yards | Neat appearance, pest protection, moderate turning | Limited capacity | $-$$ |
| Compost Tumbler | Fast results, easy turning | Quick composting (2-6 weeks), minimal effort | Higher initial cost, smaller capacity | $$-$$$ |
| Open Pile | Large volumes, unlimited space | Free, unlimited size, easy to build | Less tidy, more space needed, pests possible | Free |
Size matters: Aim for at least 3 feet × 3 feet × 3 feet. This volume generates enough heat for efficient decomposition.
Location, Location, Location
The Goldilocks Zone:
- ☀️🌤️ Partial shade (full sun = too dry, heavy shade = too wet)
- 🏠 10-20 feet from your house
- 🌱 On bare soil when possible (lets beneficial organisms migrate up)
- 💧 Level ground with good drainage
- 🚶 Easy access from kitchen and garden
Avoid: Directly under trees (aggressive roots), against wooden structures (moisture damage), low spots where water pools.
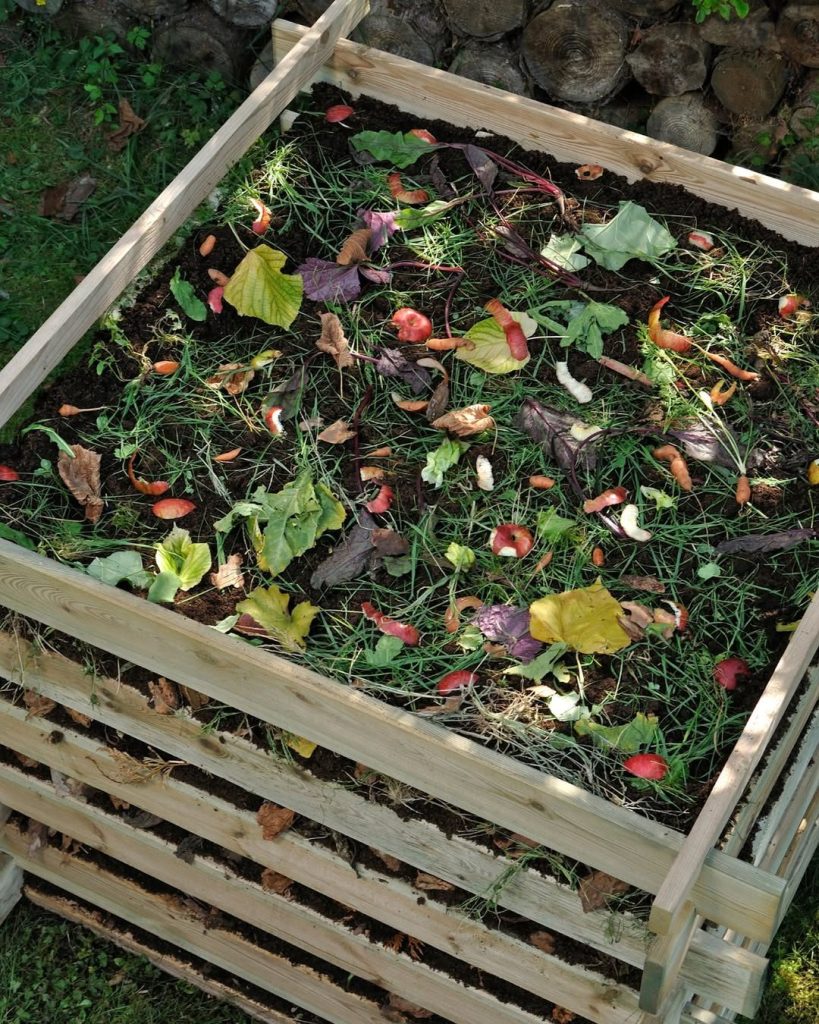
Building Your First Pile: Layer by Layer
The Foundation (First 4-6 inches): Start with coarse brown materials—small twigs or shredded cardboard. This creates airflow from the bottom up.
The Layering Pattern:
- Add 2-3 inches of greens (kitchen scraps, fresh grass)
- Add 6-9 inches of browns (dried leaves, shredded paper)
- Sprinkle a thin layer of garden soil (introduces helpful bacteria)
- Moisten until damp like a wrung-out sponge
- Repeat!
Pro Tips:
- Chop materials into 1-2 inch pieces for faster breakdown
- Don’t compact—the pile needs to breathe
- Cover with cardboard to retain moisture and manage pests
Your Composting Timeline: What to Expect
The Composting Calendar
| Timeframe | What’s Happening | What You’ll See | Your Action |
|---|---|---|---|
| Days 1-7 | Microbes multiply rapidly | Pile heats up to 140-150°F | Add water if dry |
| Weeks 2-4 | Peak decomposition | Materials shrink significantly | Turn weekly |
| Weeks 5-8 | Cooling phase begins | Less recognizable materials | Turn every 2 weeks |
| Months 3-6 | Final maturation | Dark, crumbly texture | Monitor moisture |
| Month 6+ | Ready to use! | Earthy smell, unrecognizable materials | Harvest and enjoy! |
Note: Hot composting with weekly turning = 1-3 months. Cold composting with minimal turning = 6-12 months.
Maintaining Your Pile: The Simple Routine
The Weekly Check-In (5 Minutes)
Squeeze Test: Grab a handful
- Water drips out = Too wet → Add browns
- Falls apart dry = Too dry → Add water
- Holds shape, feels damp = Perfect!
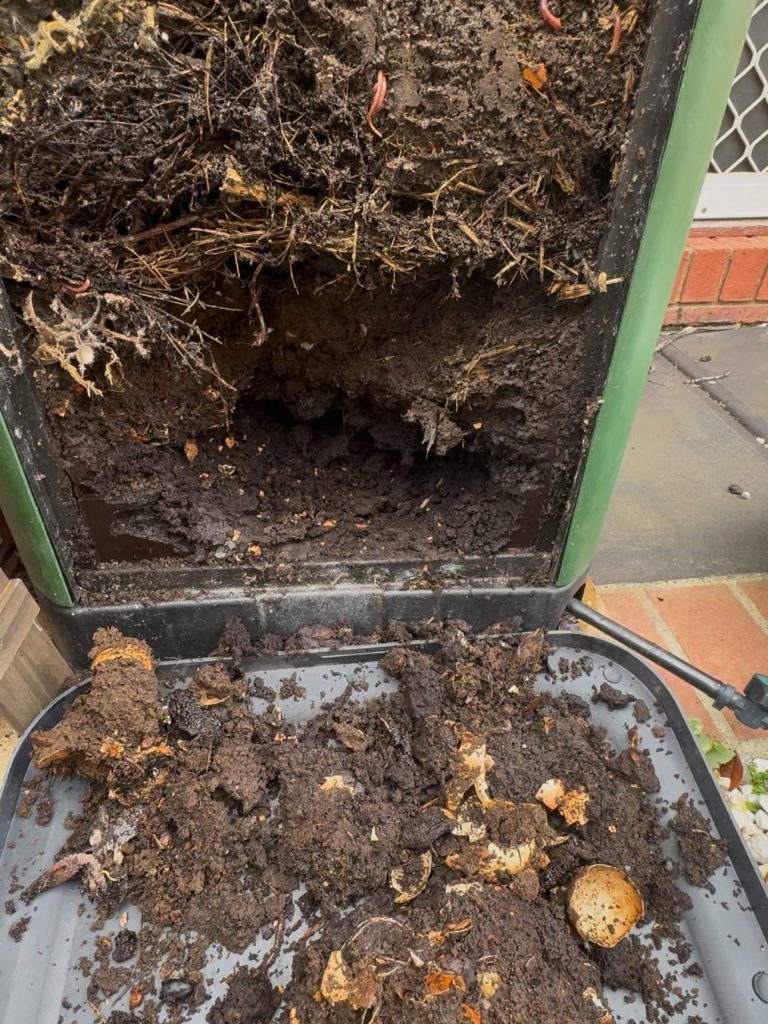
Smell Test:
- Earthy, forest floor = Healthy
- Ammonia smell = Too much nitrogen → Add browns
- Rotten eggs = No oxygen → Turn immediately
Temperature Check:
- 140-150°F = Active and perfect
- Below 100°F = Add greens or turn
- Above 160°F = Turn to cool it down
Turning: Your Most Important Task
Why turn? Introduces oxygen, redistributes moisture, and speeds up decomposition by 50-70%.
How often?
- Hot composting: Every 1-2 weeks
- Cold composting: Once a month or not at all
- Troubled pile: Immediately
The technique: Use a pitchfork to move outer material to the center and center material to the outside. Think of it as fluffing a pillow.
Special Methods for Every Situation
Comparison: Find Your Perfect Match
| Method | Time to Finish | Space Needed | Effort Level | Best For |
|---|---|---|---|---|
| Hot Composting | 1-3 months | 3×3×3 ft minimum | High (weekly turning) | Quick results, killing weed seeds |
| Cold Composting | 6-12 months | 3×3×3 ft minimum | Low (occasional turning) | Hands-off approach, no time pressure |
| Vermicomposting | 2-4 months | Under 2 sq ft | Medium (weekly feeding) | Apartments, indoor composting |
| Tumbler | 3-8 weeks | 2×2 ft footprint | Low (easy rotation) | Small spaces, neat appearance |
Vermicomposting: The Indoor Option
Perfect for apartments or year-round indoor composting! Red wiggler worms eat up to half their body weight in food each day.
Setup needs:
- Plastic bin or purchased worm composter
- Red wiggler worms (not earthworms!)
- Bedding: shredded newspaper, coconut coir
- Temperature: 55-77°F
Worm-friendly foods: Vegetable scraps, fruit waste, coffee grounds, crushed eggshells, shredded paper
Avoid: Citrus, onions, garlic, spicy foods, meat, dairy, oily foods
Bonus: Worm castings are more nutrient-rich than traditional compost!
Using Your Finished Compost
The Readiness Test
✅ Your compost is ready when:
- Color: Dark brown to black
- Texture: Crumbly like rich soil
- Smell: Earthy and pleasant
- Temperature: Cool (matches air temperature)
- Materials: No longer recognizable
Application Guide by Garden Type
Vegetable Gardens:
- Spread 2-3 inches and work into top 6 inches of soil
- Apply before planting and as side dressing during growth
Flower Beds:
- Mix 2-3 inches into top layer
- Mulch around plants with 1-2 inches
Lawns:
- Screen compost finely
- Apply 1/4 to 1/2 inch layer across grass
Container Plants:
- Mix 1 part compost to 3 parts potting soil
Trees & Shrubs:
- Spread 2-4 inches deep as mulch
- Keep 3-4 inches away from trunk
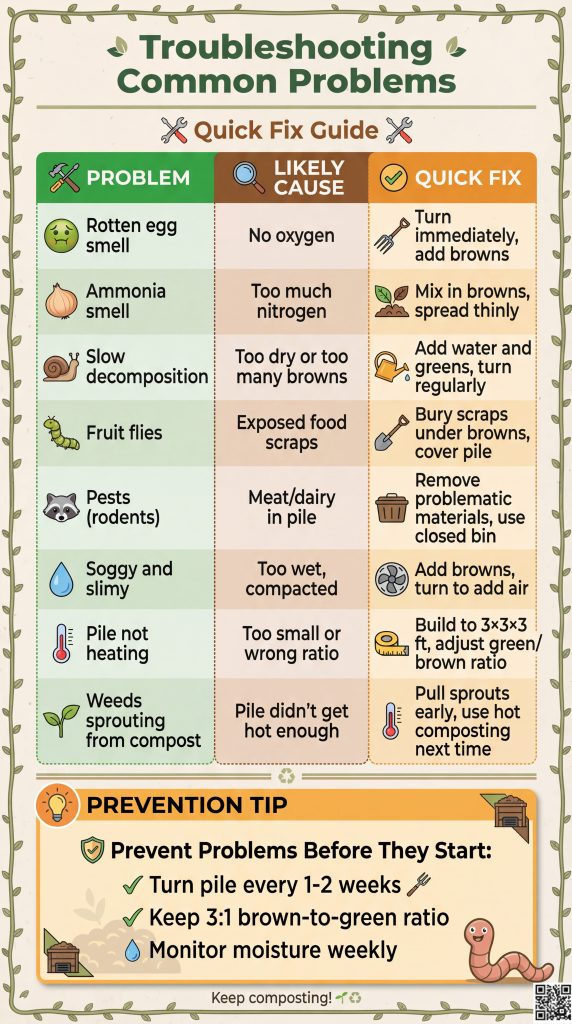
Troubleshooting Common Problems
Quick Fix Guide
| Problem | Likely Cause | Quick Fix |
|---|---|---|
| 🤢 Rotten egg smell | No oxygen | Turn immediately, add browns |
| 🧅 Ammonia smell | Too much nitrogen | Mix in browns, spread thinly |
| 🐌 Slow decomposition | Too dry or too many browns | Add water and greens, turn regularly |
| 🐛 Fruit flies | Exposed food scraps | Bury scraps under browns, cover pile |
| 🦝 Pests (rodents) | Meat/dairy in pile | Remove problematic materials, use closed bin |
| 💧 Soggy and slimy | Too wet, compacted | Add browns, turn to add air |
| 🌡️ Pile not heating | Too small or wrong ratio | Build to 3×3×3 ft, adjust green/brown ratio |
| 🌱 Weeds sprouting from compost | Pile didn’t get hot enough | Pull sprouts early, use hot composting next time |
Your Composting Journey Starts Now
Remember, composting is forgiving. Your first pile might not be perfect, and that’s okay. Each batch teaches you something new about the process. Start small, learn as you go, and before you know it, you’ll be producing rich, dark compost that transforms your garden.
Ready to begin? Grab a container for kitchen scraps today. Your garden—and the planet—will thank you.
Quick Start Checklist:
- ☐ Choose your location
- ☐ Select bin, tumbler, or pile method
- ☐ Gather initial brown materials
- ☐ Set up kitchen scrap collection
- ☐ Build your first layers
- ☐ Mark calendar for first turning
- ☐ Start imagining your thriving garden!
Happy composting! 🌱♻️

