If you love growing succulents and want to increase your own collection, you can propagate new plants from the ones you already have. Propagation is a relatively simple way of increasing the number of plants that you have.
It’s also a great way to share your love for succulents with others. You can grow many more plants that you can then give away to your family or friends. Or, you could even start a side-business and sell the new plants that you produce.
In this guide, we’re going to show you exactly how to propagate succulents. Even if you’ve never tried propagation before, you’re sure to find success if you follow these steps.
Choose Your Propagation Method
With succulents, there are four ways that you can propagate new plants. These depend on the type of succulent you want to propagate and include the following:
- Collecting seeds from your current plants after they’ve flowered.
- Twisting off mature leaves
- Taking stem cuttings from existing plants.
- Using offsets from succulents that produce these.
We’ll talk about each method in more detail but first let’s discuss the materials and tools you need to gather first.
Gather Your Tools And Growing Materials
There are various tools that every propagator needs. Plus, you have to have the correct growing medium so that your new plants have the best chance of producing roots.
Here’s a list of the tools that you need:
- Mature succulents
- Sharp secateurs or a sharp knife
- Planting tray
- Some newspaper or paper towel
- Propagating mix
- Spray bottle for misting the cuttings
Make sure that your tools are clean before you use them. You can easily sterilize your planting tray and cutting implements in some bleach. This will ensure that you’re not transferring any bacterial or fungal diseases to your plant material.
To propagate succulents, you can use the same mix that you use to grow them in. It should be a fairly loose mix that promotes really good drainage. You can either purchase a mix specifically for growing succulents or you can make your own.
The perfect recipe for a good mix is:
- 2 parts good quality potting mix
- 2 parts coarse sand
- 1 part Perlite or pumice
This mix provides adequate drainage and also is loose enough for the developing roots to make their way down into the soil.
Now let’s look at the different propagation methods in more detail.
Propagating Succulents From Seeds
This is the ideal way to propagate a lot of cacti that produce large showy flowers. Once the flowers have finished their display, you’ll find that seed pods start to develop.
The time to collect the seeds is when the pods are dry and start to open. Carefully remove the seed pods from the plant and collect the seeds on some paper. Most seeds are tiny, so you’ll have to take care not to lose too many.
Once you’ve collected your seeds, follow these simple steps:
- Fill your planting tray with the propagation mix.
- Carefully scatter your seeds on top of the mix. There’s no need to cover the tiny seeds at this stage.
- Using the spray bottle, mist the soil to moisten it but do not saturate.
- Because seeds need humidity to germinate effectively, cover the tray with a clear plant cloche or plastic bag.
- Place the tray in a warm spot away from direct sunlight.
- Keep an eye on the tray and mist when the soil looks dry.
- It might take several weeks for your seeds to germinate.
- Once you see new plants starting to grow, you can remove the cover and lightly mist them when the soil is dry.
- Continue to keep the new plants in a warm spot until they’re large enough to transplant into their own pots.
Propagating Succulents From Leaves
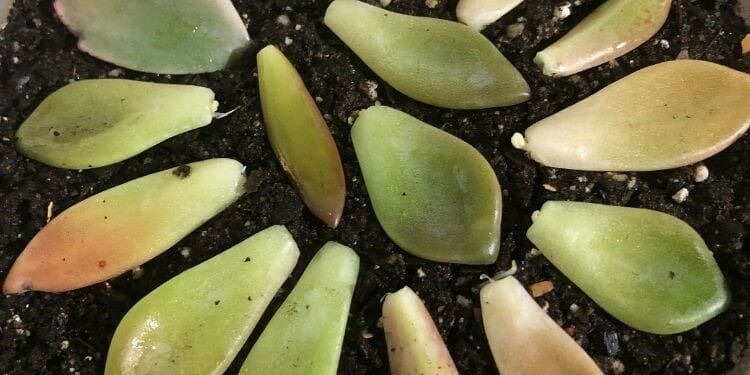
Many species of succulents are easy to propagate from leaves. This is also the easiest way to propagate succulents. Succulents that have fleshy, plump leaves like Sedum and Echeveria are best for this propagation method.
You want to choose a healthy plant that has lots of plump leaves. Then follow these steps:
- Gently twist off some leaves from the parent plant. Make sure you get the whole leaf as partial or broken leaves won’t work. If you can’t twist the leaf off easily, use a sharp knife or a pair of secateurs to remove the leaf from the plant.
- Put the leaves you’ve removed from the plant onto some newspaper or paper towel. Then place them in a warm, bright spot to let them dry out. This could take several days. Allowing the leaves to dry out prevents fungal growth from developing on the cut ends.
- Your leaves are ready for planting once callouses have formed on the cut end. These callouses are where the roots will grow from.
- Fill your tray with the propagating mix and water well.
- Place the calloused leaves on top of the soil. There’s no need to bury them.
- Now, put the tray in a bright, warm spot out of direct sunlight.
- Keep an eye on the tray and lightly mist whenever the soil looks dry.
- If you monitor your propagating plants, you’ll start to see small roots sprouting from the base of the leaves within a few weeks.
- Keep misting the plants and let the roots travel into the soil.
- After more times has passed, you’ll see new leaves beginning to grow and the original leaf will die off. Your new plants are now ready to pot up into their own pots.
Propagating Succulents From Cuttings
A lot of plants are propagated from stem cuttings and this can work for succulents too. This works really well for succulents that produce branches.
Make sure that you use healthy plants to gather your cuttings from and follow these steps:
- With a sharp pair of secateurs, cut a piece of stem just above a leaf node. It’s best to take tip cuttings for this method as you want a couple of leaves left at the top of the stem. Remove any other leaves on the stem and only leave the ones at the top.
- Put these cuttings onto some paper and leave them in a bright, warm spot to dry out. This is the same as you would do with leaf cuttings.
- Once callouses start to form at the cut end of the stem, your cuttings are ready for planting.
- Prepare your propagating tray with the mix.
- You might want to assist root formation by dipping your cuttings into some rooting hormone. You can use one that your purchase from your local garden store or you can use a more natural rooting hormone. Both pure, natural honey or cinnamon powder work extremely well for this.
- Use a pencil or dibbler to poke a hole into the propagating mix and push the stem of your cutting into this. Making a hole first ensures that you don’t dislodge any of the rooting hormone when you push the stems into the mix.
- Now you can mist the tray and place it into a bright, warm spot out of direct sunlight.
- Monitor your tray of cuttings and mist when the soil looks dry.
- Within a few weeks, your stems will have produced roots and you’ll see new plant growth. It’s then time to repot these new plants into their individual pots.
Creating New Plants From Offsets
Using offsets is one of the best way to create new plants from your existing succulents. This is because the parent plant is already doing the job for you. Not all succulents produce offsets but quite a few do.
Offsets can grow either from the base of a succulent or from the leaf tips. There are different ways of dealing with these offsets.
If your succulents produce offsets at the base, follow these steps:
- In order to remove these offsets, you’ll have to get to the roots to separate them from the parent plant.
- Remove enough soil from the pot or around the top of the plant until you can see the roots.
- Now, gently separate the offsets from the parent by teasing the roots apart. Be careful not to damage any roots if you can.
- If the offsets are still attached to the parent plant, gently cut them away with a sharp knife to separate them.
- Place these offsets on some paper in a bright, warm spot to let them dry out a little.
- Once you see callouses forming at the base of the plants, they’re ready to be planted.
- Fill your propagating tray with mix and water well.
- Create a planting hole for each offset and plant it. Make sure you firm the soil back around the base of the plants.
- Place the tray in a brightly lit spot out of direct sunlight and mist with water if the soil looks dry.
- Within a few weeks, you’ll see new growth on the tiny plants. They’re now ready to be repotted into their own containers.
If your succulents produce offsets from the tips of the leaves, follow these steps:
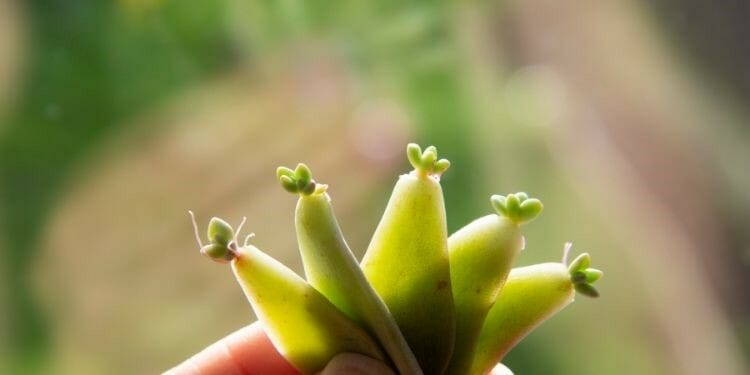
- Pull the offsets from the leaves by gently tugging on them. If they won’t come off easily, you can use a sharp knife to cut them off.
- Place these offsets on some paper and put in a bright, warm spot to dry out and callous.
- Once callouses appear, you can plant them in the propagating tray with the mix that you prepared beforehand.
- Place the tray in a warm, brightly lit spot out of direct sunlight.
- Keep an eye on the tray and mist if the soil looks dry.
- Once your little plants start to produce new growth, you can pot them up into individual planters.
When Is The Ideal Time To Propagate Succulents?
Succulents can be propagated any time of the year but the best time is spring and summer when the weather is nice and warm. This is also the time that your succulents are actively growing as some succulents go dormant in winter.
Also, if your current plants are starting to get a bit leggy, you should prune them to encourage a more bushy growth. But don’t throw away those prunings. You can easily use these to produce many more plants.
If you do want to try propagating new plants in the cooler months, make sure you have a warm spot inside to keep your propagating trays. Adequate warmth is required to encourage root growth for all cuttings.
Frequently Asked Questions:
Can you propagate all succulents?
Generally, yes. However, there are some succulents that are privately bred by plant breeders. These may have a patent and you are not allowed to propagate those without permission of the plant breeder or patent holder.
How long does it take to propagate succulents?
This varies depending on the propagation method. Generally, leaf cuttings take around 2 weeks to start producing roots and stem cuttings take around 4 weeks. Other factors that influence how long it takes for roots to form include the species and the temperature.
How often should I water propagating succulents?
It’s best to mist your propagating succulents regularly so that they do not dry out. Never let the soil dry out completely when you’re propagating these plants.
Final Thoughts
Now you know everything there is to know about how to propagate succulents. We do hope this information has been useful and encourages you to try propagating your own succulents.
It can be a fun and rewarding way to add to your collection or to share your love of succulents with your family and friends.
Have you successfully propagated your own succulents? Which method did you find worked best for you? Please feel free to share your experiences with us in the comments below.


