It’s hard to resist the spectacular blooms of Stargazer lilies if you spot them growing in a neighborhood garden. They look quite exotic, so you would assume that they’re difficult to grow.
This is far from the truth as these gorgeous blooms are surprisingly easy to grow even in pots. Follow our detailed step-by-step guide to have the most amazing display of stargazer lilies every spring.
Growing Stargazer Lilies in Pots: My 10 Steps!
1. Choose Your Pot
Generally, you can leave your lily bulbs in the same pot for at least a couple of years, so you want to select a nice pot that you’re happy to have on display. Make sure your pot has drainage holes as the bulbs will rot if they’re left sitting in water.
Therefore, it’s also a good idea to put some loose gravel or even broken pieces of terracotta in the bottom of the pot to aid in drainage.
2. Choose Your Potting Mix
As these lilies will be living and growing in your pots for quite some time, you want to ensure that you buy the best quality potting mix that you can afford.
You can even purchase specialized potting mixes made for bulbs. You should select a mix that is slightly acidic as lilies prefer this. If making your own mix, try a mix of 1 part sand, 2 parts of peat moss and 3 parts of soil or well matured compost.
3. Plant Your Bulbs
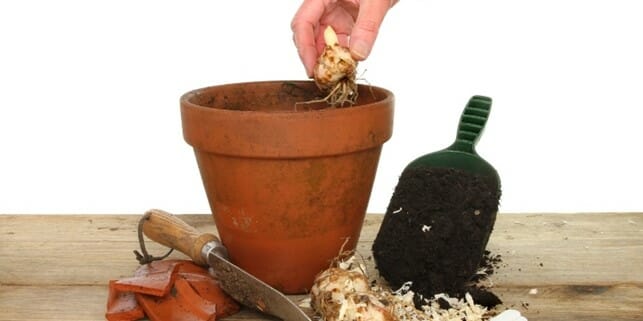
Stargazer lily bulbs are available as ‘cloves’ just like garlic. When you have a look at the bulb, you’ll see the main central bulb in the middle and many smaller bulblets coming off the sides. Don’t be tempted to separate these ‘baby’ bulbs as these will take much longer to flower when planted separately.
Therefore, it’s best to plant the entire ‘clove’ into the pot. Eventually the ‘baby’ bulbs will separate under the soil and form their own ‘cloves’. If your pot is large enough, you can even plant 2-3 bulbs in the same pot.
The lily plants themselves are upright growers, so they don’t take up much room. Plus, they do look more spectacular when grouped together.
Plant your bulbs about 4 inches below the top of the soil in the pot. Don’t be concerned if the remaining potting mix that you add, covers the top of the ‘sprout’. The sprout will push through the soil soon enough.
4. Add Some Slow Release Fertilizer
Stargazer lilies are heavy feeders, so it’s best to add some slow release granules to the potting mix after you’ve planted the bulbs.
You can then top up the fertilizer during the growing season as well as the following spring to give your plants a boost over the summer flowering season.
5. Water Well
Once your bulbs are planted in the pots, it’s time to give them a thorough watering. As mentioned before though, don’t leave your pots sitting in water. They should be able to drain freely.
On the other hand, don’t let them dry out either. Make sure the soil in the pots is kept moist but not wet. If you have trouble remembering to water your pots, there are many slow release watering aids available that will keep the soil just moist enough for your plants to thrive.
6. Enjoy The Blooms!
Stargazer lilies bloom in the summer, so get ready for a gorgeous display as the weather warms up. During this time, it’s especially important not to let your pots dry out.
Tip: When watering your lilies, only apply the water to the base of the plant so that it gets to the roots. Avoid getting water onto the blooms as this could spoil them.
7. Remove The Spent Blooms
Once you’re lily blooms are finished, you can remove the spent blooms but leave the green foliage. Removing the spent blooms is called ‘deadheading’ and should be done to avoid the formation of seed pods.
The remaining green foliage will continue photosynthesizing and this will feed the bulbs so they can get ready for next year’s blooms.
Remember to keep watering even after flowering is finished.
8. Remove The Spent Foliage
Once the foliage turns brown, you can remove it as it’s no longer able to photosynthesize. You can then move the pots to a more secluded spot in the garden where they’ll sit over winter.
During this time, make sure that you still keep the soil moist but definitely not wet. The pots should never be left to dry out completely.
9. Springtime Care
When Spring arrives, it’s time to bring your lily pots back out and place them in a more prominent spot in your garden. Lilies will grow happily in full sun or even semi-shade.
Add another dose of slow release fertilizer to the growing medium and wait for the first sprouts to appear.
10. You Can Divide Your Bulbs Every 2 – 3 Years
After your stargazer lilies have been happily growing in the same pot for 2 or 3 years, it’s time to divide and re-pot them. Do this early in Spring.
Just take the bulbs out of the pot carefully by removing some of the soil first. Then, carefully brush away any excess soil from around the bulbs. At this point, you can separate the individual ‘cloves’ and then re-pot them into the same pot. This is also a good time to refresh the potting mix.
If you do this, you’ll find that you have extra bulbs left over because lilies will multiply while in the soil. You can either plant these into another pot, into a suitable spot in your garden or give them to a friend.
Tip: Make sure you keep your lily plants well away from your cat if you have one. Lilies are toxic to cats but not to dogs or humans.
Frequently Asked Questions:
How long do stargazer lilies take to grow?
After planting, it takes about 3 weeks for the sprouts to first appear.
How deep do you plant stargazer lilies?
Plant your bulbs about four to six inches below the top level of the soil in the pot.
Do stargazer lilies come back every year?
Yes, they will come back in Spring after being dormant during winter.
Final Thoughts
Stargazer lilies provide a wonderful display of large, showy blooms with a heady, spicy fragrance. You’ll be surprised at how easy they are grow if you follow our guide.
Remember to keep them well watered but don’t let them sit in water, as this can cause the bulbs to rot. They’ll enjoy a sunny spot but will grow happily in some dappled shade too.


